Menu Bar
In this section you will learn how to use the Menu Bar. As mentioned before, it includes connections to the Home Page and the Account.

It contains also a Search bar and a Burger menu that will be treated in details here below.
Search Bar
The Search Bar of the portal allows you to find point of interests (POIs), streets or locations by name (default) or by coordinates.
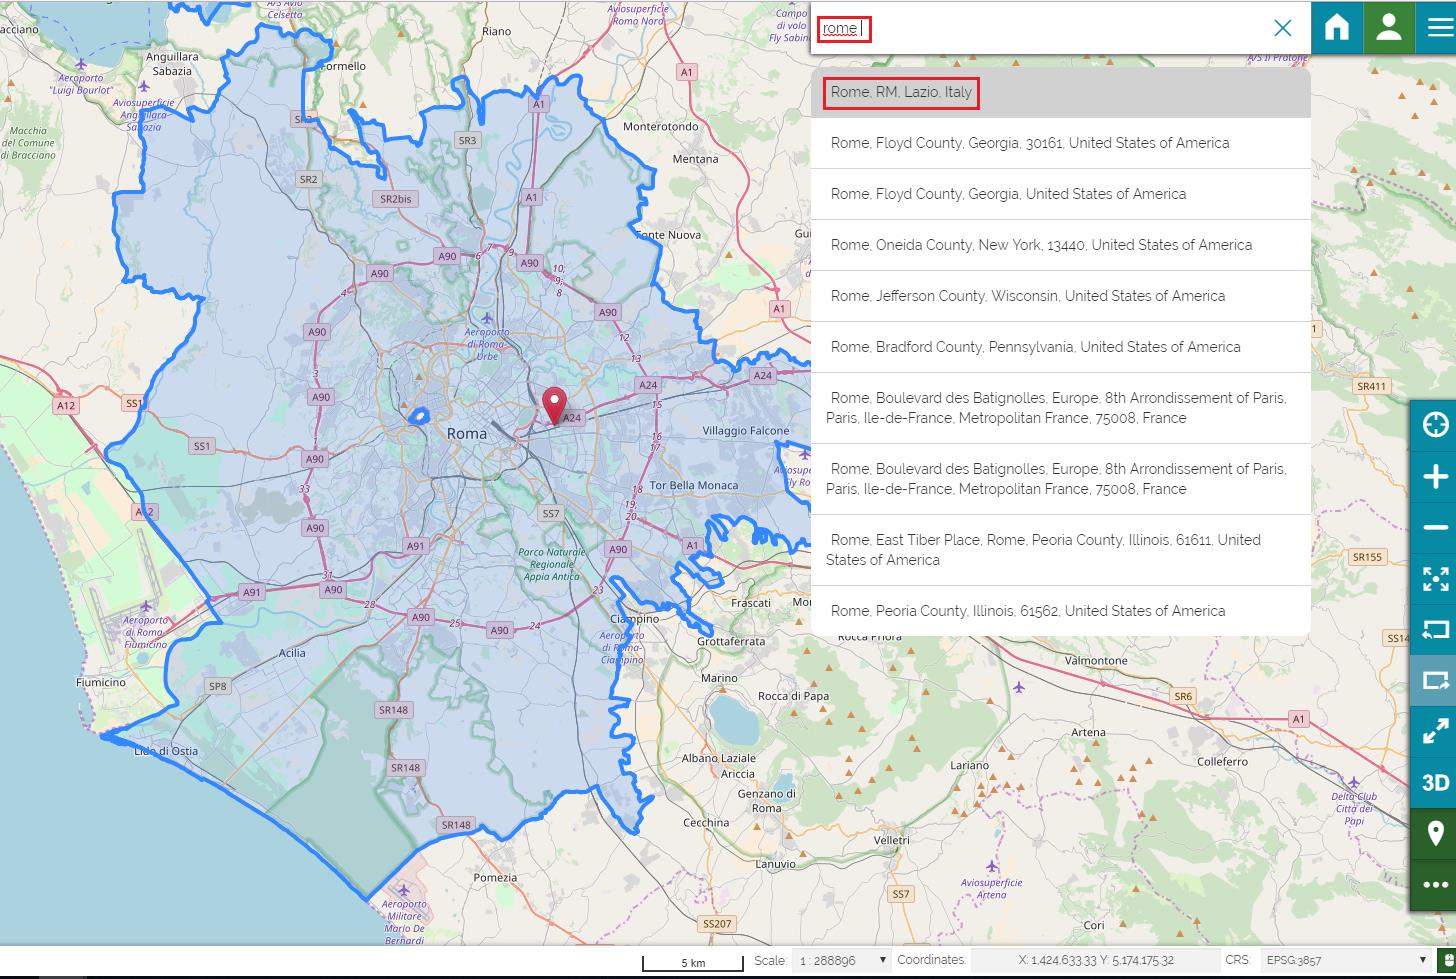
In the Search Bar, for example, Type the text "rome" then Select the first record. The map will automatically re-center on that area delimiting it by a polygon in the case of an area, by a line in the case of a linear shape (e.g. streets, streams) and by a marker in the case of a point.
Searching by coordinates
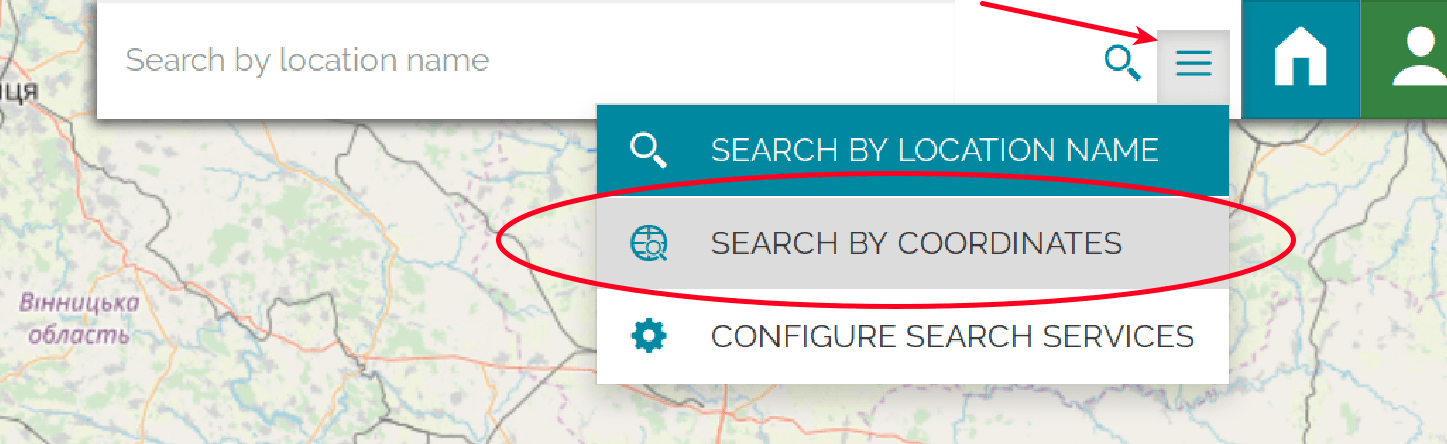
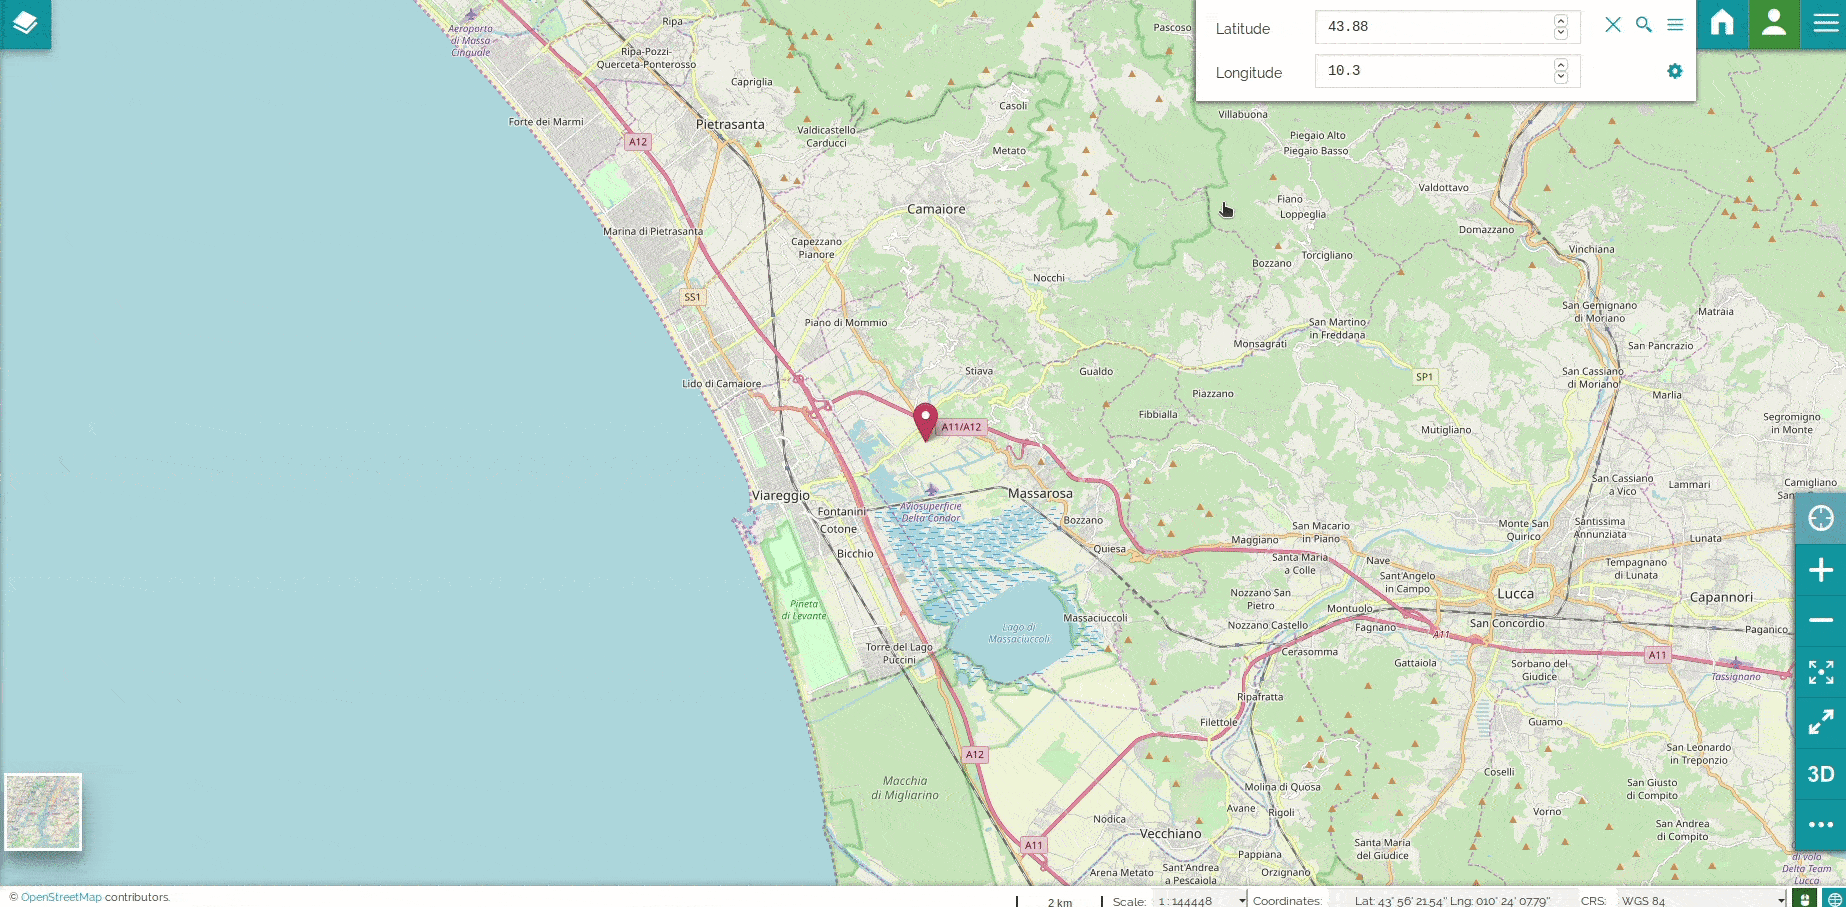
Through the Search Bar you have the possibility to zoom to a specific point and place a marker in its position. The map will be centered in that point.
The point can be specified typing its coordinates both in decimal and aeronautical formats.
Warning
This functionality is available in desktop mode only, on mobile it is disabled.
To experience this, follow these steps:
-
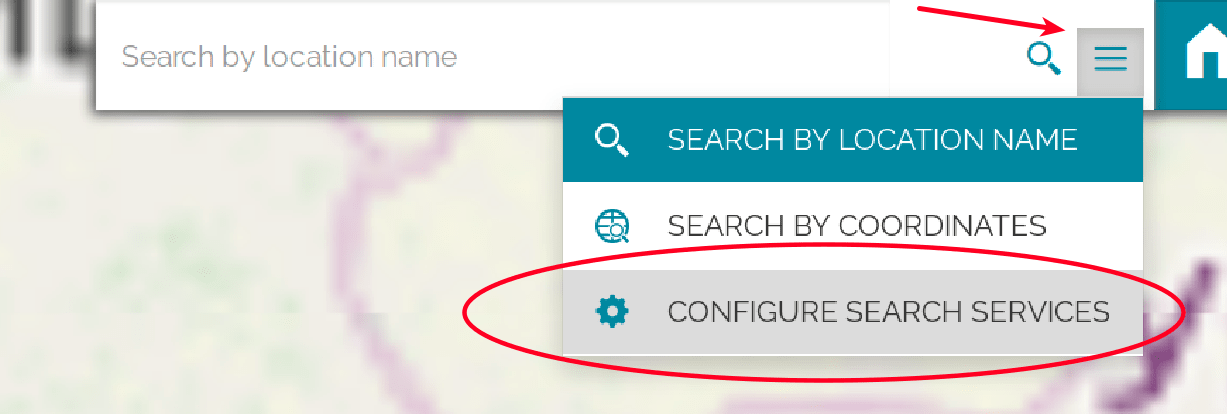
click on the Burger Icon of the Search Bar to open the Options Panel
-
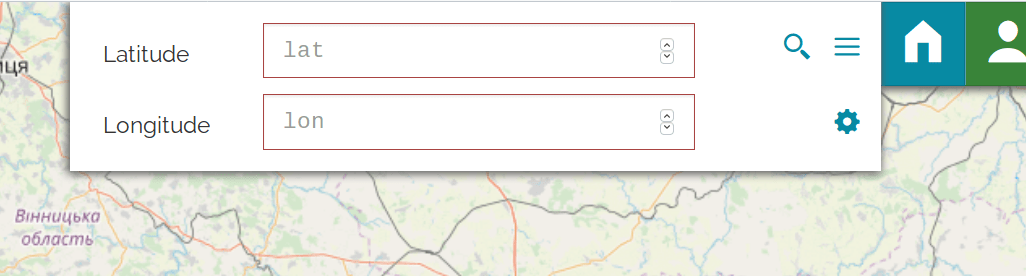
click on Search By Coordinates to activate the coordinates input fields (Decimal format by default)
-
type Latitude and Longitude and click on the magnifying glass icon
 to perform the search
By default MapStore use the decimal format but the aeronautical one is also available. Click the gear icon ![]() of the coordinates editor, select Aeronautical and click on it to switch to this coordinate format.
of the coordinates editor, select Aeronautical and click on it to switch to this coordinate format.
As you can see, the coordinates editor can be cleaned using the button ![]() .
.
Custom WFS Searches
When you search a place, you might want to extend the default OSM results through additional WFS Search Services. The Configure Search Services option of the Search Bar allows you to do that.
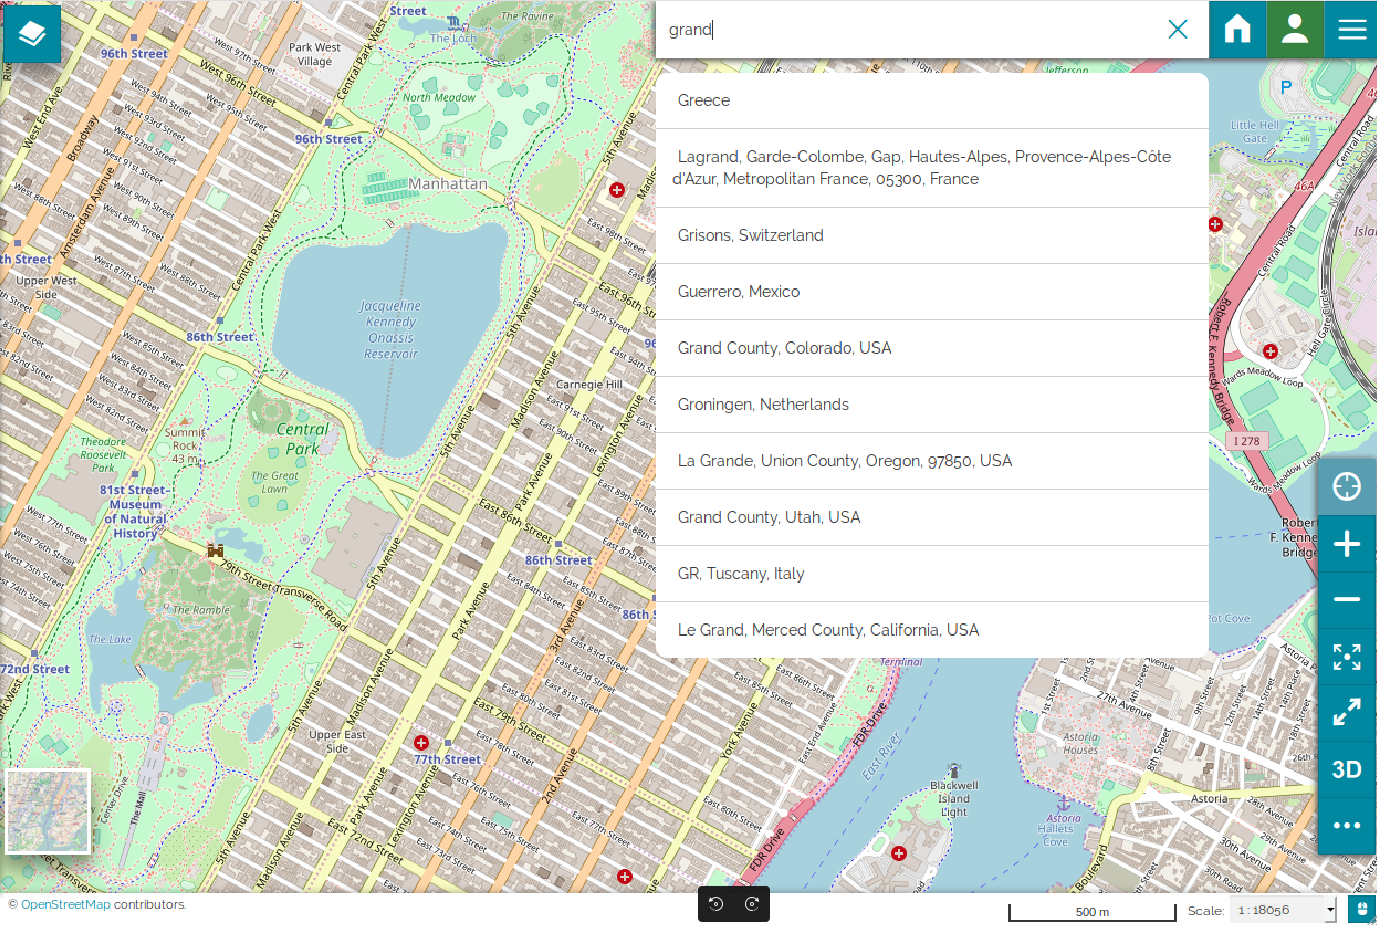
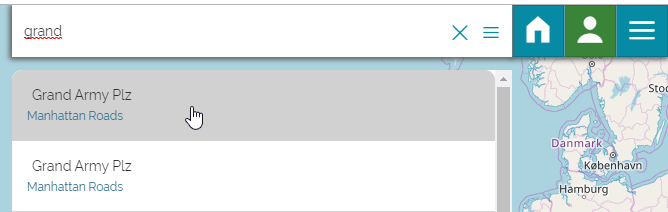
To better understand how it works, create an empty map and try to search somethings, for example 'grand', and see the result provided by the OpenStreetMap Nominatim search engine:
The following example shows the steps required to set up a custom service:
-
Click on the Burger Icon of the Search Bar, the options panel will open
-
Click on the Configure search services button to open the Create/edit search service panel
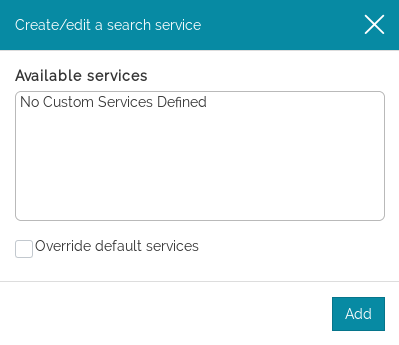
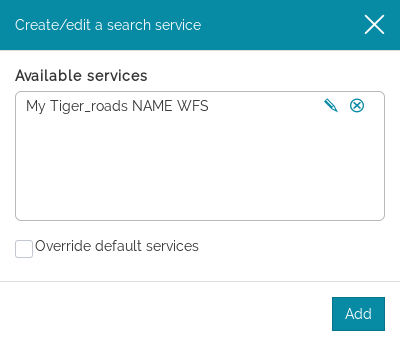
The custom search services are listed in the Available services section.
-
Click on the Add button to open the WFS service props form and fill out it
-
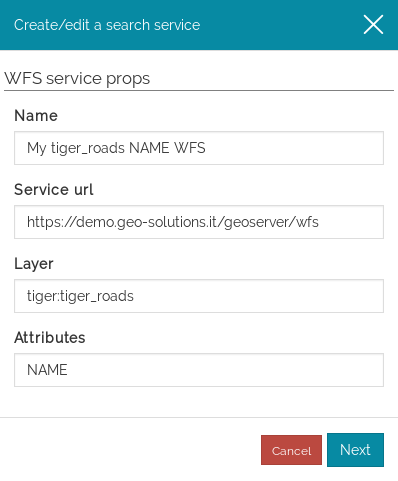
Name can be whatever you prefer, it is a good practice to refer it to some other properties as the Layer and/or the Attributes
-
Service url is the WFS you want to call, in this example we used a WFS service available on the GeoSolutions Demo Server
-
Layer is the layer from which you want to retrieve information, for example the TIGER layer Manhattan (NY) roads
-
Attributes identifies which field should be considered by the search query, in this case we are interested in roads' name so we choose the NAME field
-
-
Click on the Next button to open the Result display properties form
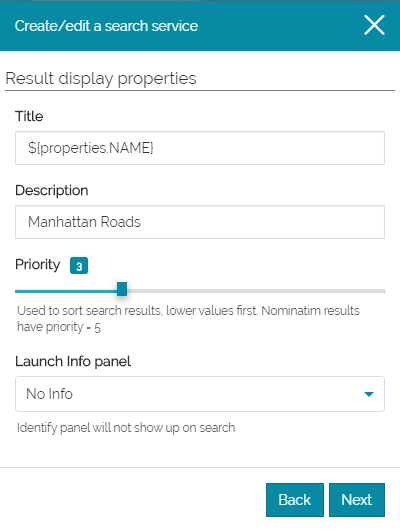
-
Title is displayed on the top of each results row. You might want to show here the content of the fields of interest, in this example we choose to display the NAME field values so we type
${properties.NAME} -
Description is displayed to the bottom of each results row. We use Manhattan Roads to point out the source layer name but feel free to change it. You can use the same property placeholder syntax here.
-
Priority is a weight assigned to the custom results. It is used to sort all the search results so lower values determine higher positions in the results list (top). The default OpenStreetMap Nominatim search engine result has priority equals to 5, so to see our custom results in the first positions we should set a value lower than 5 for this field. We use 3.
-
Launch Info Panel is a flag that can be used to trigger GetFeatureInfo requests when selecting a record after a search. The point for the GFI request is taken from the selected record's geometry. It has three values as shown here:
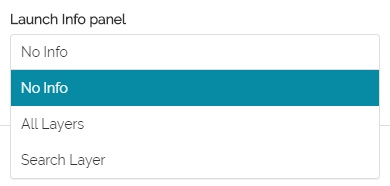
- "No info" means that no GFI request will be triggered and it is the default value.
Note that, in the following cases, the point used for GFI request is a point on surface of the geometry of the selected record
- "Search Layer" means that the GFI will filter results to the record selected and to its layer. It will also force the info_format to "application/json" (PROPERTIES).
- "All Layers" means that there will be no filtering as it happens when you click on map.
-
-
Click on the Next button to open the Optional props form
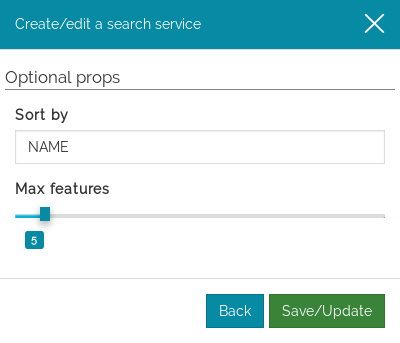
-
Sort by lets you decide on which field to sort the results, we choose NAME again
-
Max features is the maximum number of rows displayed in your custom search results, in this example we consider that 5 is enough
-
-
Click on the Save/Update
 button to save your settings
Now you can see your custom WFS Search Service in the Available services list, click on the Edit ![]() icon if you want to change some settings or on the Delete
icon if you want to change some settings or on the Delete ![]() icon to remove this service from the list.
icon to remove this service from the list.
Come on to test our new search service. Type 'grand' in the search box again and take a look at the results:
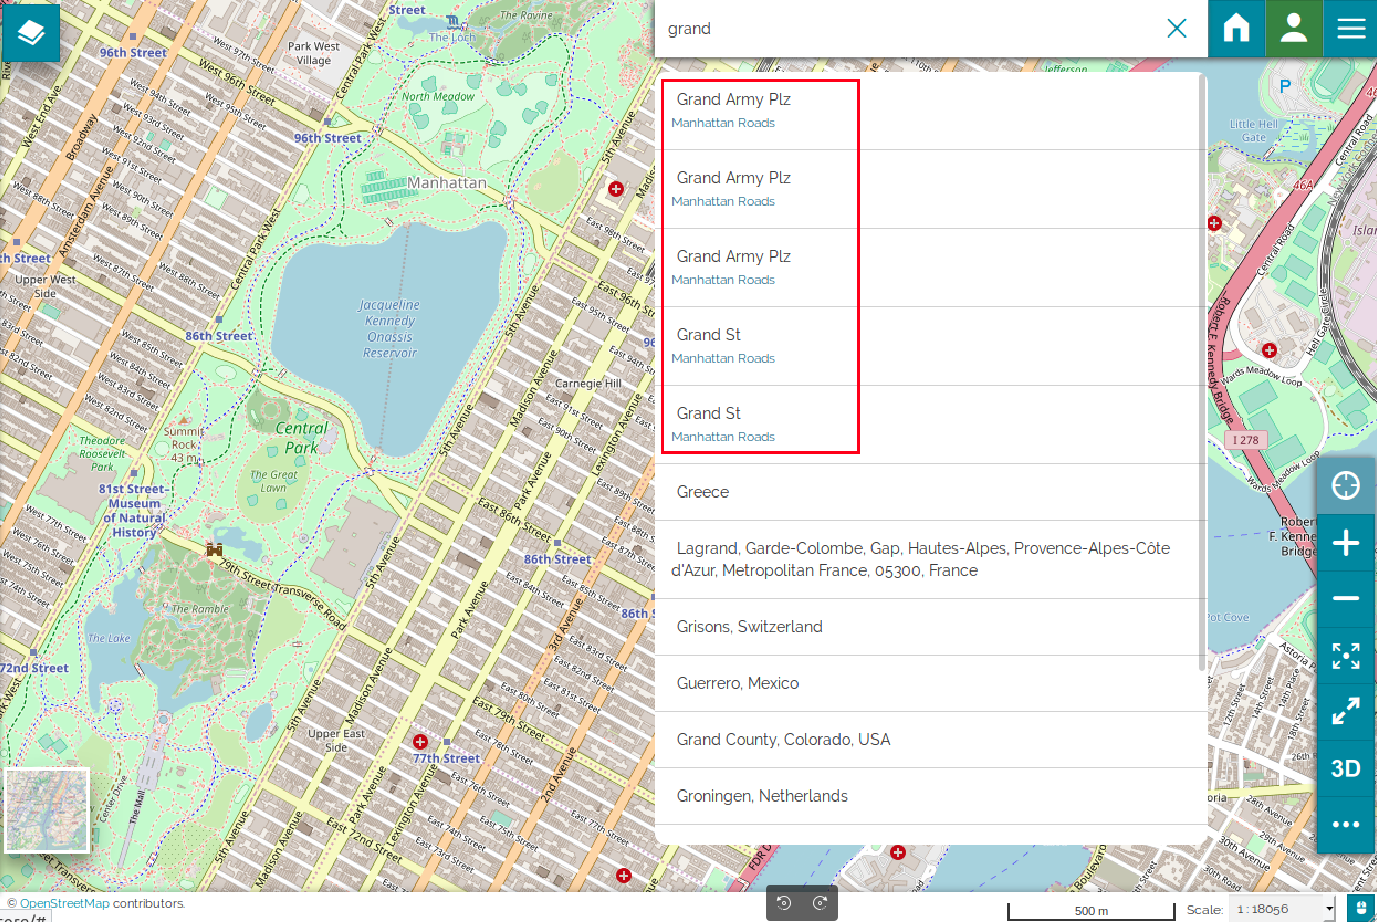
We have 5 (the Max features) more results displayed in the first five positions (because of Priority), these results are labelled as Manhattan Roads (the Description) and they show the roads' names (the Title) at the top of each row. The results are sorted by NAME (the Sort by property).
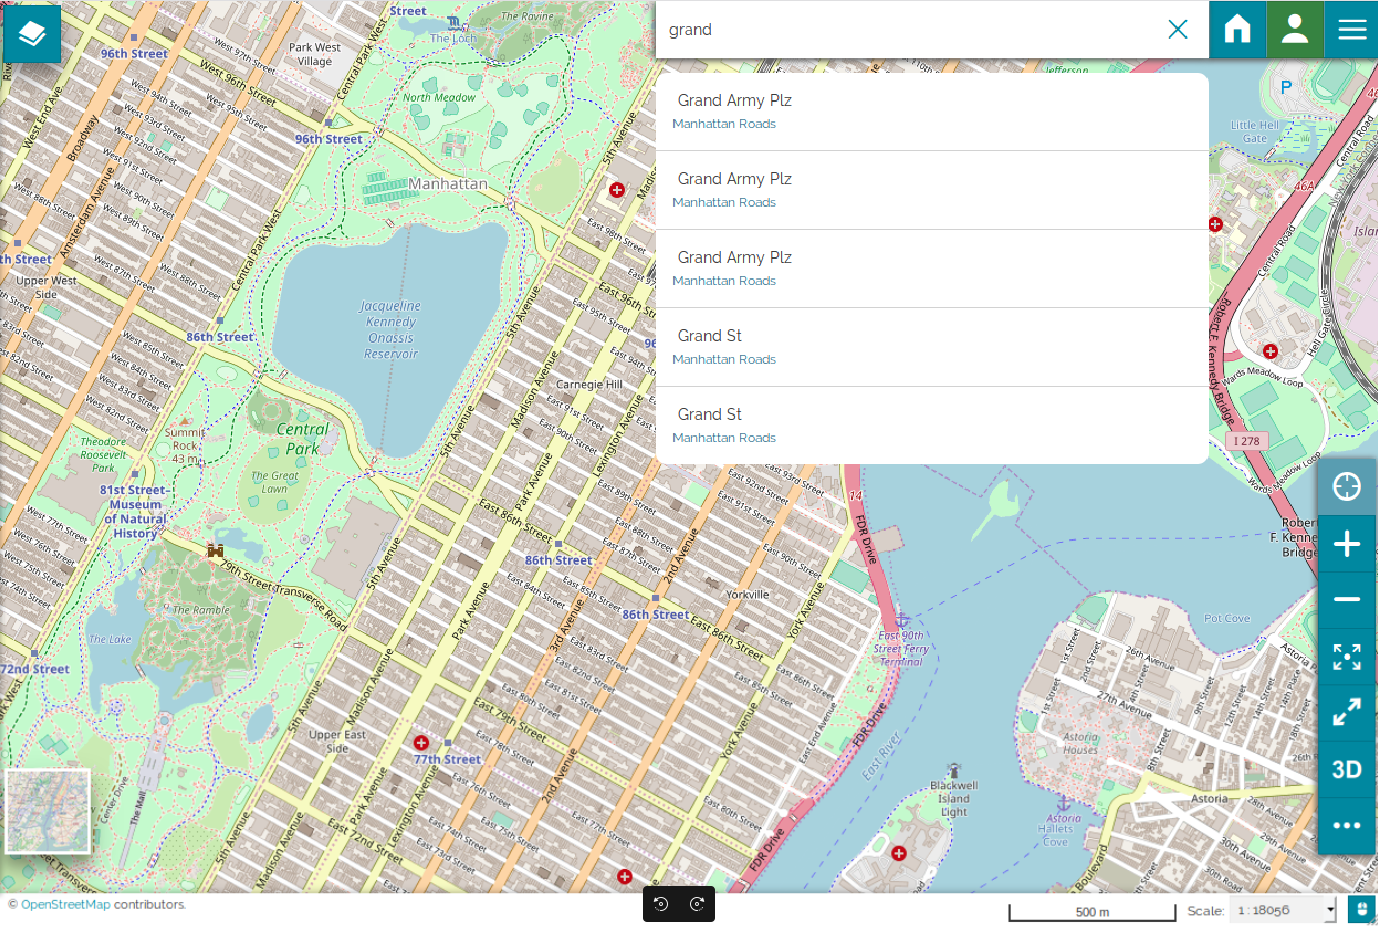
The Override default services option of the Create/edit search service panel, if enabled, allows to show only those results from your custom service. Let's tick the checkbox corresponding to this option:
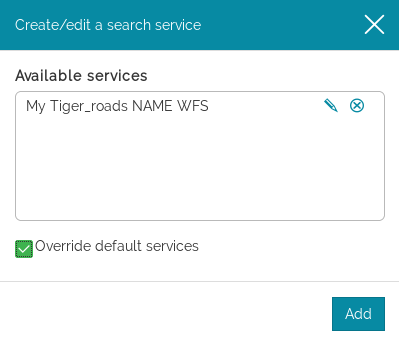
Since the option is enabled no results from the default service are shown:
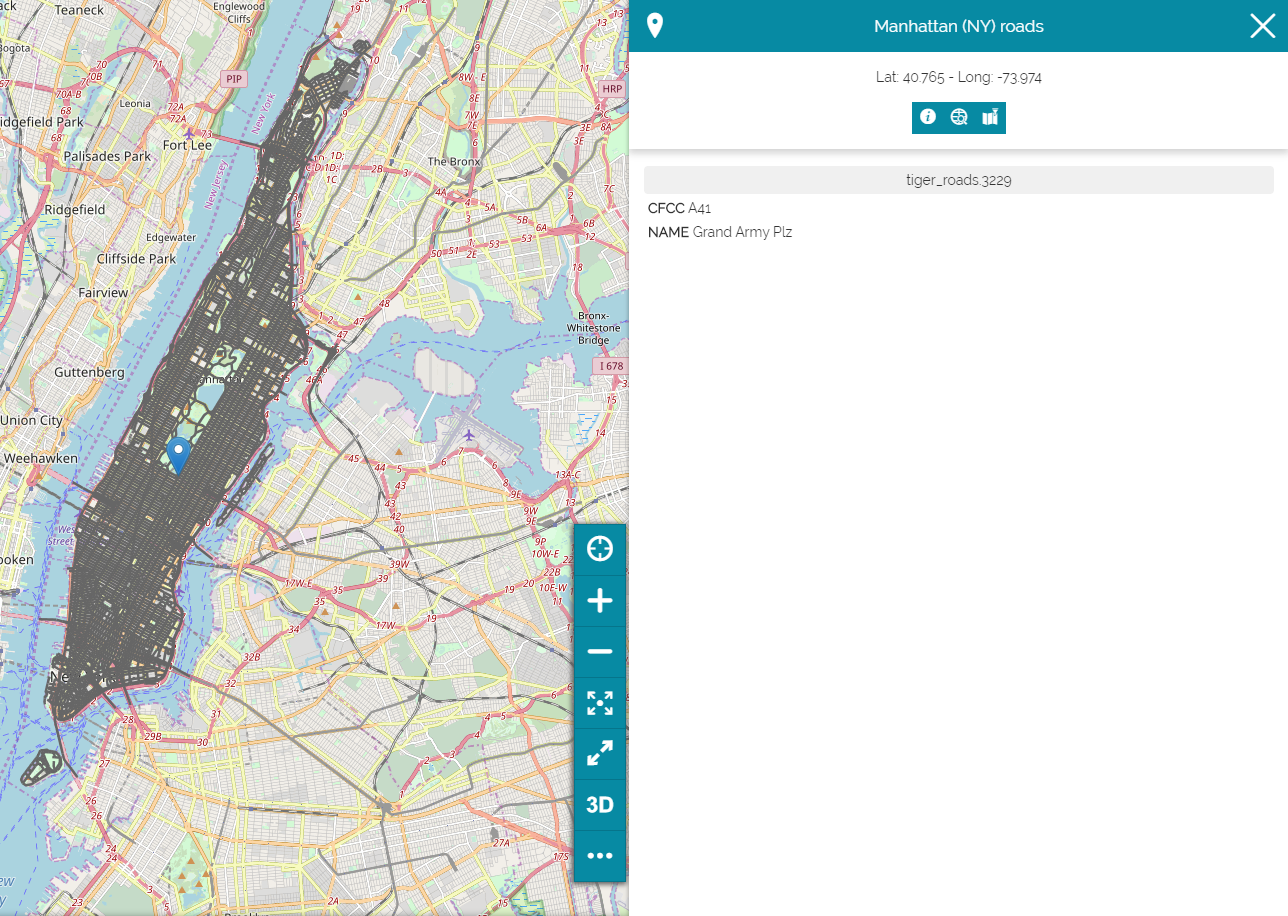
Testing Launch Info panel options
You can follow the previous procedure and use "Search Layer" as launch info panel value.
You can see that when you click on the first result
The result will be something like:
If "All Layers" option is used then the results would be something like this:
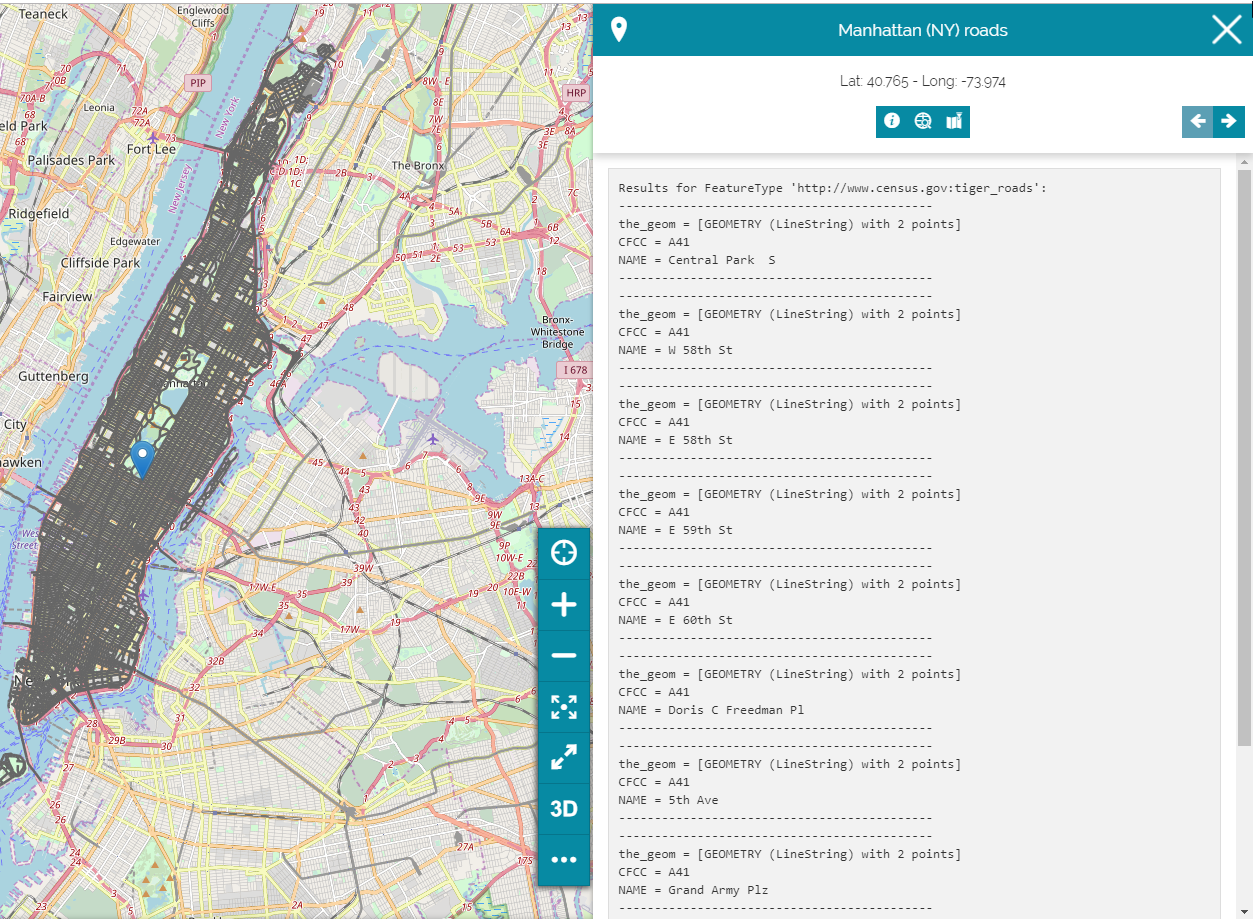
Since other layers are on the map then the navigation arrows is visible in the top-right corner of the FeatureInfo panel
Burger Menu
The Burger Menu is the core of the Menu Bar and it will be later addressed in details. It contains several options to add data from different sources to the map, to perform measurments and to save, print and share the created map.
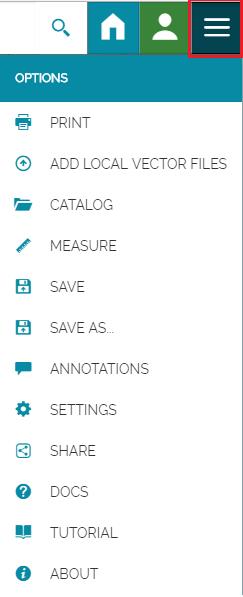
Click on the following links to learn more about the main options:
- PRINT: allows you to print a created map;
- ADD LOCAL VECTOR FILES: allows to import from your machine vector files to be added to the map;
- CATALOG: allows you to import data from several remote services;
- MEASURE: tools to perform measurments on the map;
- ANNOTATIONS: allows you to create customized annotations and add them to the map;
- SHARE: allows you to share your map.